How to Change to Landscape in Adobe InDesign
Landscape orientation is used for wider horizontal designs or subjects. It is commonly applied to a page that contains a…
Apr 24, 2023
Learn how to save an EPS image as a PNG file. That way, you can find it easy to convert it from one file to another when you need to.

For the purpose of this case, we will be using Adobe Photoshop as an example, though you can do this just as easily in Illustrator as well. Here are three easy steps to converting EPS to PNG.

To get started, open Adobe Photoshop to start converting your EPS image to PNG. Then you can easily drag and drop your EPs image into Photoshop.


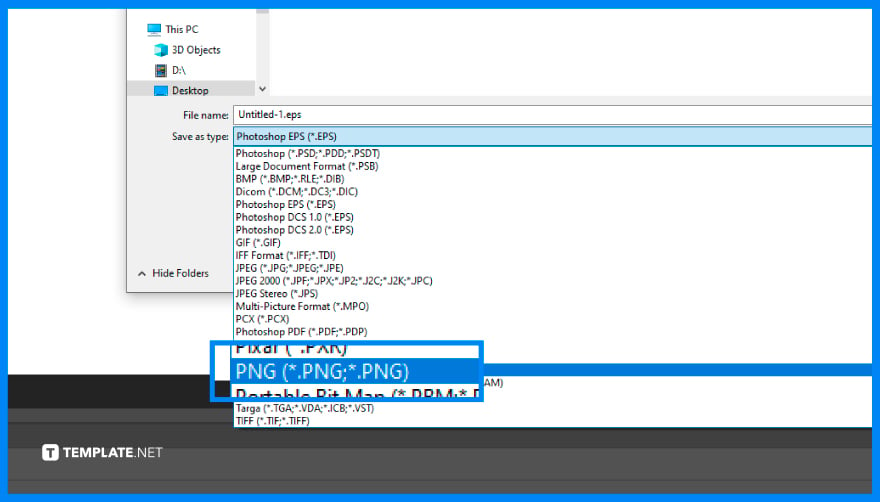
Next, click ‘File’ on the menu bar and click on ‘Save As’ next. This will open a dialog box.

On the dialog box, click the dropdown and choose the PNG file format option. Once that is done, click the ‘Save’ button and you are all set with converting EPS to a PNG file.
No, you will have to convert one EPS image into PNG files at a time.
You have the option to use online tools available on the Internet or use other programs such as GIMP for example.
Yes, you can, as there are other options you can pick besides PNG like JPEG for example.

Landscape orientation is used for wider horizontal designs or subjects. It is commonly applied to a page that contains a…
![How to Adjust Line Spacing in Adobe InDesign [Templates + Examples] 2023](https://images.template.net/wp-content/uploads/2022/08/How-to-Adjust-Line-Spacing-in-Adobe-InDesign-788x444.png)
Adjust line spacing in Adobe InDesign so you won’t have to stick to the default letter spacing, character spacing, word…
![How to Add a Watermark in Adobe InDesign [Templates + Examples] 2023](https://images.template.net/wp-content/uploads/2022/08/How-to-Add-a-Watermark-in-Adobe-InDesign-788x444.png)
Add a watermark to any document or image designed in Adobe InDesign as a way to explicitly send a message…

A header is a top margin on each page of your document or publication. Headers are useful for adding material…

Circular pictures and designs work best for website avatars or profile pictures, site favicons, and other integral design elements that…

Calendars help individuals to stay organized and manage their time wisely for their personal life and professional life. It is…

Picas is the default unit of measurement in Adobe InDesign, however, there are also different units of measurement available in…

Adobe Photoshop helps users creatively execute their ideas into actual images. An EPS file can be read and edited in…

Unless you’re working with Adobe SVG graphics, creating an impressive website requires a lot of time and patience. However, if…