


10 Shortcuts for Deleting Rows and Columns in Excel
Microsoft Excel is a robust tool for streamlining workflow, and knowing the ’10 Shortcuts for Deleting Rows and Columns in Excel’ is essential for efficient data management. This guide focuses on practical techniques to quickly adjust your spreadsheets, enhancing productivity and accuracy in your work, whether for business or personal use.

1. Deleting a Single Row
To quickly remove a row in Excel, click on the row number located on the left side of your screen to select the row first. Then, simultaneously press the “Ctrl” and “-” keys. A “Delete” dialog box will appear, allowing you to either shift the cells up or remove the entire row. This method ensures the precise deletion of your selected row.
2. Removing Multiple Rows Simultaneously
For deleting multiple rows at once, select the desired rows by clicking and dragging over their row numbers. Then, use the “Ctrl” and “-” shortcuts. The same “Delete” dialog box will pop up, offering options to either shift the cells up or delete the entire rows. This technique is efficient for bulk row deletion.
3. Swift Row Deletion Without a Dialog Box
To delete a row instantly without triggering the “Delete” dialog box, select the row as previously described. Next, press the “Ctrl” and “–” keys, followed by the “Enter” key. This action removes the row and automatically shifts the cells up, streamlining the process.
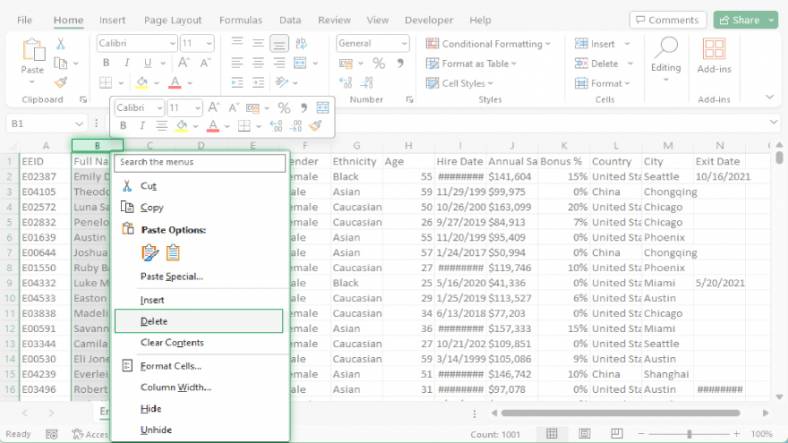
4. Using the Context Menu for Row Deletion
Another method involves using the context menu. Right-click on the row number and select “Delete” from the menu. The familiar “Delete” dialog box will surface, where you can choose between shifting cells up or deleting the entire row. This approach is user-friendly and offers a straightforward deletion process.
5. Deleting a Row via the Ribbon
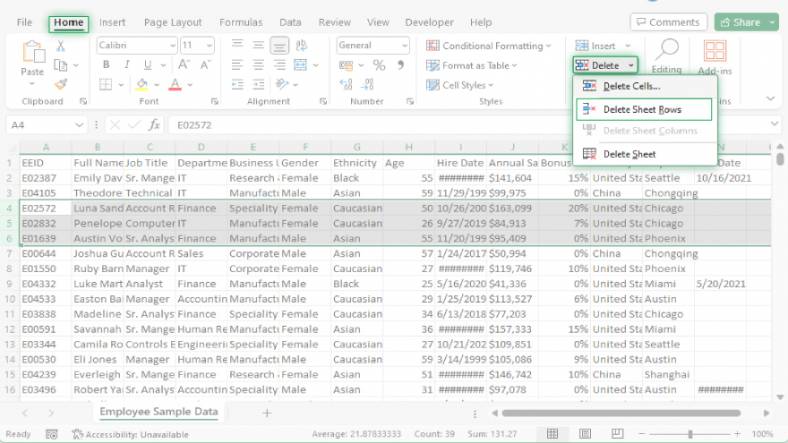
For those who prefer using the Excel ribbon, row deletion is also accessible. After selecting the row, navigate to the “Home” tab. In the “Cells” group, click on the “Delete” button. This action brings up the “Delete” dialog box, where you can opt to shift cells up or remove the entire row. This method integrates seamlessly with the Excel interface for an efficient workflow.
You can also refer to these helpful articles on how to use Excel shortcuts:
6. Deleting a Single Column
To remove a single column in Excel, click on the column letter at the top of your worksheet to select it. Then, press “Ctrl” and “-” simultaneously. A “Delete” dialog box will appear, offering you the choice to either shift the cells left or completely delete the column. This method is precise and effective for singular column removal.
7. Removing Multiple Columns at Once
For deleting several columns simultaneously, select your desired columns by clicking and dragging over their letters. Press “Ctrl” and “-” just like with a single column. The same “Delete” dialog box will open, where you can opt to shift cells left or delete all the selected columns. This is an efficient way to manage bulk column deletions.
8. Quick Column Deletion Without a Dialog Box
If you prefer to delete a column without the “Delete” dialog box appearing, select your column as before. Press “Ctrl” and “–” followed by “Enter”. This action will delete the selected column and automatically shift the cells left, simplifying the deletion process and saving time.
9. Using the Context Menu for Column Deletion
Column deletion can also be done via the context menu. Right-click on the column letter and choose “Delete” from the menu. This triggers the “Delete” dialog box, where you have the option to either shift cells left or completely remove the column. This approach is straightforward and user-friendly.
10. Deleting a Column Using the Ribbon

For those who prefer the ribbon interface in Excel, column deletion is accessible and straightforward. After selecting the column, go to the “Home” tab. In the “Cells” group, click the “Delete” button. This brings up the “Delete” dialog box, providing options to either shift cells left or delete the entire column. This method integrates smoothly with Excel’s ribbon, offering a consistent user experience. Also, learn about how to use the Excel AutoFit Column Width shortcut to boost your Excel skills.
FAQs
Can I delete multiple rows or columns at once in Excel?
Yes, you can delete multiple rows or columns by selecting them and pressing “Ctrl” and “-.”
Is there a way to delete a row or column without a confirmation dialog?
To delete without a dialog box, select the row or column, press “Ctrl” and “–”, then hit “Enter.”
How do I delete a single row or column in Excel?
Click the row number or column letter and press “Ctrl” and “-” to delete a single row or column.
Can I use the ribbon to delete rows and columns in Excel?
Yes, you can use the “Delete” button in the “Cells” group on the “Home” tab to delete rows and columns.
Is it possible to undo a deletion of a row or column in Excel?
You can undo a deletion by pressing “Ctrl” + “Z” immediately after the deletion.
More in Excel

