


How to Add Check Boxes in Microsoft Excel
Microsoft Excel offers a convenient tool for enhancing your spreadsheets with checkboxes, a feature that simplifies task tracking and project management. This guide provides step-by-step instructions on how to add and use checkboxes effectively, catering to both business and personal needs for improved efficiency.

Add Check Boxes in Microsoft Excel
-
1. Enable the Developer Tab
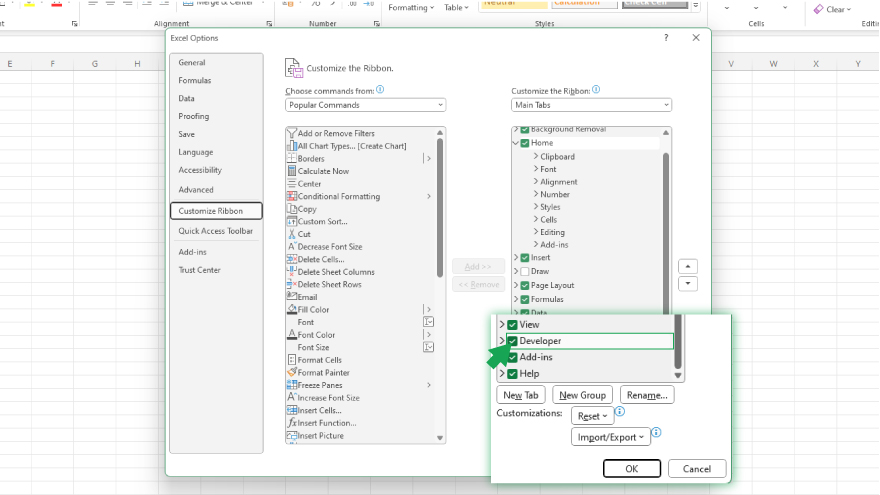
To begin adding checkboxes in Microsoft Excel, first enable the Developer tab. This tab is hidden by default, but unlocking it is straightforward. Start by right-clicking on any area of the Ribbon. Choose ‘Customize the Ribbon…’ from the context menu. In the Excel Options dialog box, you will find a list of tabs on the right side. Tick the ‘Developer’ option and hit ‘OK.’ The Developer tab should now be visible in your Ribbon, equipping you with the necessary tools, including Form Controls, for adding checkboxes.
-
2. Insert Check Boxes in Excel
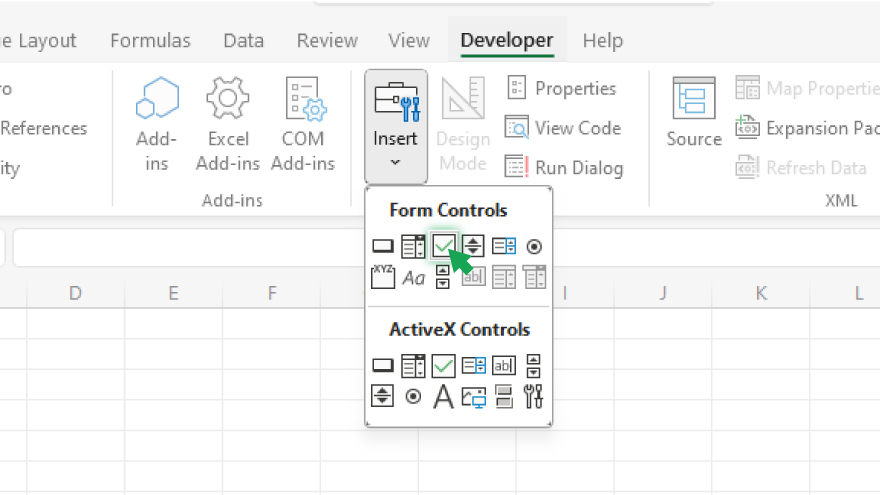
Once the Developer tab is active, adding check boxes becomes a simple task. Navigate to the Developer tab and select ‘Insert.’ From the ensuing drop-down menu, choose the check box located under ‘Form Controls.’ Your cursor will change into a crosshair. Use this to click on your desired location in the worksheet to place the check box. Repeat these steps to insert additional checkboxes. Each check box comes with a text label, which you can remove by clicking on it and pressing the Delete key, leaving the check box unaffected.
-
3. Edit Check Boxes
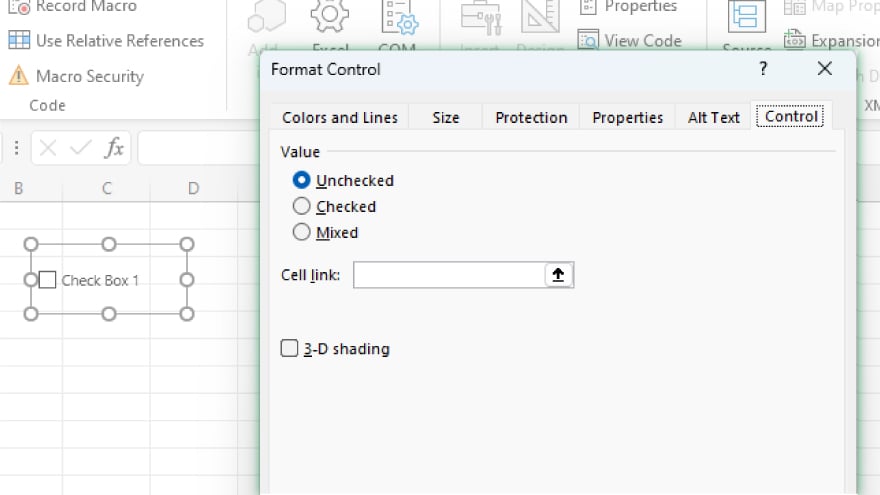
Excel offers flexibility in customizing your checkboxes. Adjusting their size and position is quite intuitive. Click on a check box to see handles around it, which you can drag to resize. To move a check box, drag it to a new position. Further customization is accessible through the Format Control dialog box. Right-click on the check box and select ‘Format Control…’ In this dialog box, under the ‘Control’ tab, you’ll find various options to tweak the properties of your check box to your liking.
You may also find valuable insights in the following articles offering tips for Microsoft Excel:
4. Link Check Boxes to Cells
A key feature of Excel’s checkboxes is their ability to link to cells. This creates dynamic interactions within your worksheet. For instance, when a check box is checked or unchecked, a linked cell can display a corresponding value (TRUE or FALSE). This functionality is invaluable for interactive charts, conditional formatting, and other advanced features. To link a check box to a cell, right-click on the check box and choose ‘Format Control…’ In the Format Control dialog box, under the ‘Control’ tab, enter the cell reference (like A1) in the ‘Cell link’ field and click ‘OK.’ Now, the state of the check box will directly reflect in the linked cell, enhancing your Excel document’s interactivity.
FAQs
What are checkboxes in Excel, and how are they used?
Checkboxes in Excel are interactive elements used for selecting or deselecting options, accessible through the Developer tab, and useful for tracking tasks or options within cells.
How do I enable the Developer tab in Excel to add checkboxes?
Right-click on the Ribbon, select ‘Customize the Ribbon,’ and check the ‘Developer’ box in the Excel Options dialog.
What are the steps to insert a check box in an Excel worksheet?
Go to the Developer tab, click ‘Insert,’ select the check box under ‘Form Controls,’ and click on your worksheet to place it.
Can I delete the text label next to a check box in Excel?
Yes, click on the text label and press the Delete key to remove it while keeping the check box.
How can I resize or move a check box in Excel?
Select the check box and drag the handles to resize, or drag the box itself to move it.
More in Excel

