


How to Create a Timeline in Microsoft Excel
Microsoft Excel is a versatile tool for creating detailed timelines, offering features to meticulously outline project milestones, deadlines, and progress tracking. This guide helps you effectively use Excel to craft clear, organized timelines in spreadsheets, ensuring your output is excellent and aesthetically pleasing.

Timeline in Microsoft Excel
-
1. Exploring Excel’s Diverse Functions
Microsoft Excel is renowned for its diverse capabilities, extending far beyond basic number crunching and spreadsheet creation. A standout feature is its ability to craft visual aids, notably timelines. These tools are crucial for tracking project timelines, visualizing historical events, or planning. The timeline function is a key component of its comprehensive data visualization suite. It offers an intuitive method to chronologically plot dates and events on a linear scale. Though creating a timeline in Excel requires some initial familiarity with the platform, it’s a straightforward process that yields both functional and visually compelling results.
-
2. Preparing Your Excel Spreadsheet
The initial phase of creating a timeline in Excel involves setting up your spreadsheet. This process starts with inputting your data and organizing your columns efficiently. Begin by launching a new Excel spreadsheet. In your first column, chronologically list the dates of events. Adjacent to this, in the second column, enumerate the corresponding events, ensuring each column is clearly labeled for easy reference. Once your data is inputted, formatting your dates is the next crucial step. Excel offers a range of date formats; select one that aligns with your timeline’s requirements. This can be done by right-clicking on your date column, choosing ‘Format Cells,’ and then selecting your preferred date format.
-
3. Constructing the Timeline in Excel
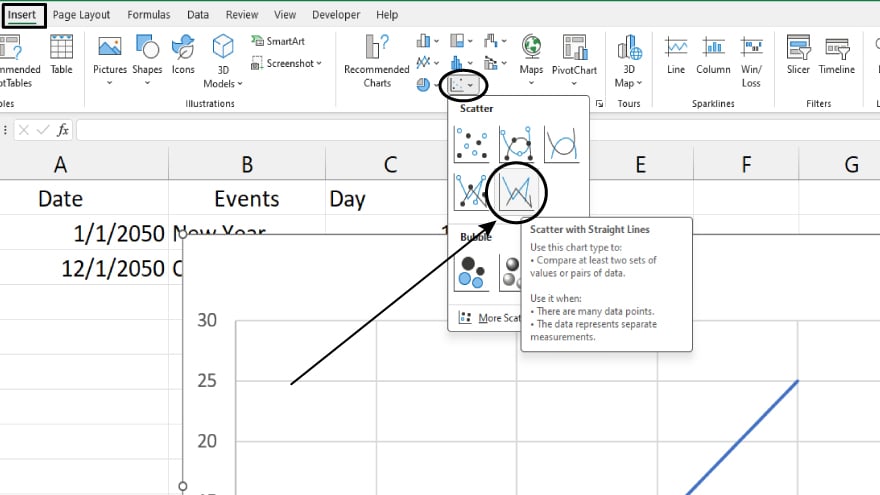
Building a timeline in Excel is a multi-step process that begins with the insertion of a scatter plot. Navigate to the ‘Insert’ tab on the Excel ribbon, select ‘Scatter,’ and choose ‘Scatter with Straight Lines’ to introduce a blank scatter plot into your sheet. Subsequently, incorporate your data into this plot.
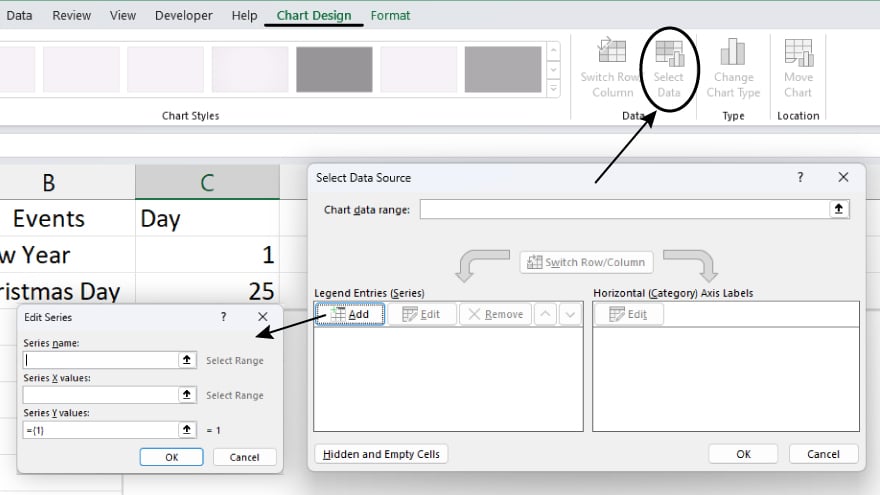
Access the ‘Select Data’ button on the ribbon, and in the ensuing dialog box, click ‘Add.’ Assign your date column to the ‘Series X values’ and your event column to the ‘Series Y values,’ then confirm with ‘OK.’ Your data will now be represented on the scatter plot. The customization phase then begins, where you can modify line styles and colors, add event labels, and more, using the tools under the ‘Format’ tab to personalize your timeline.
You may also find valuable insights in the following articles offering tips for Microsoft Excel:
- How to Group Cells in Microsoft Excel
- How to Insert a Footer in Microsoft Excel
4. Adding Final Touches to Your Excel Timeline
After constructing your timeline, adding final enhancements will ensure it stands out. Integrate a title by using the ‘Chart Title’ button on the ribbon, and clarify your axes with labels via the ‘Axis Titles’ button. These additions contribute to the timeline’s comprehensibility. To emphasize particular events, incorporate data labels through the ‘Data Labels’ button, customizing their appearance to match your timeline’s style. Lastly, remember to frequently save your progress, as Excel does not automatically do so, to safeguard against data loss.
FAQs
How do I start creating a timeline in Excel?
Begin by entering your event dates and descriptions in two separate columns on a new Excel spreadsheet.
Can I customize the appearance of my timeline in Excel?
Yes, Excel allows you to customize your timeline with different colors, labels, and line styles.
Is it possible to add labels to specific events on my Excel timeline?
You can add labels to specific events by using the ‘Data Labels’ feature in the chart tools.
How do I choose the right date format for my timeline in Excel?
Select your preferred date format by right-clicking on the date column and choosing ‘Format Cells.’
Can I save my Excel timeline as a separate file or image?
Yes, you can save your timeline as a separate file, or export it as an image for presentations or reports.
More in Excel

