


How to Shift Cells Down in Microsoft Excel
Microsoft Excel is an invaluable tool for managing data, and learning how to shift cells down is a fundamental skill for effective spreadsheet organization. This guide will provide you with clear instructions to rearrange your data, enhancing the clarity and functionality of your Excel documents.

How to Shift Cells Down in Microsoft Excel
-
Step 1. Selecting the Desired Cell or Cells
Initiating the process of shifting cells down in Microsoft Excel begins with selecting the cell or cells where new data needs to be inserted. Click on your desired cell to select it. For multiple cells, press and hold the ‘Shift’ key and navigate using the arrow keys. Remember, the cells you select will be the ones that get shifted downwards. For example, to add a new cell at the top of a column, select the topmost cell.
-
Step 2. Accessing the Insert Menu
With your cells selected, the next move is to navigate to the ‘Insert’ menu. This is in the ‘Cells’ group under the ‘Home’ tab on the Excel ribbon. Click on ‘Insert’ to reveal a dropdown menu. Here, you’ll find various options, including inserting cells, sheet rows, sheet columns, or a new sheet. To shift cells down, our focus will be on the ‘Insert Cells’ option.
-
Step 3. Opting for ‘Shift Cells Down’
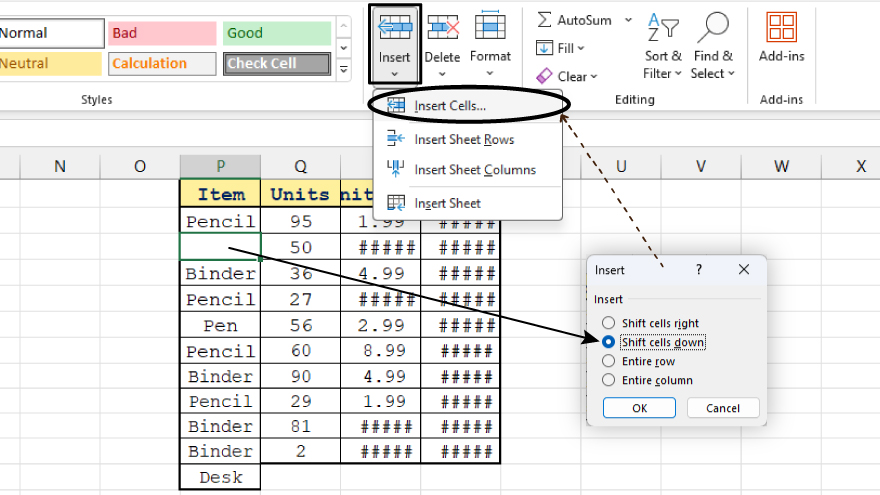
Upon clicking ‘Insert Cells,’ a dialog box appears to offer two choices: ‘Shift cells right’ and ‘Shift cells down.’ Choose the ‘Shift cells down’ option and click ‘OK.’ This action inserts a new, blank cell at your initially selected location, simultaneously shifting the other cells in that column downward, ready for new data entry.
You may also find valuable insights in the following articles offering tips for Microsoft Excel:
Step 4. Using Keyboard Shortcuts
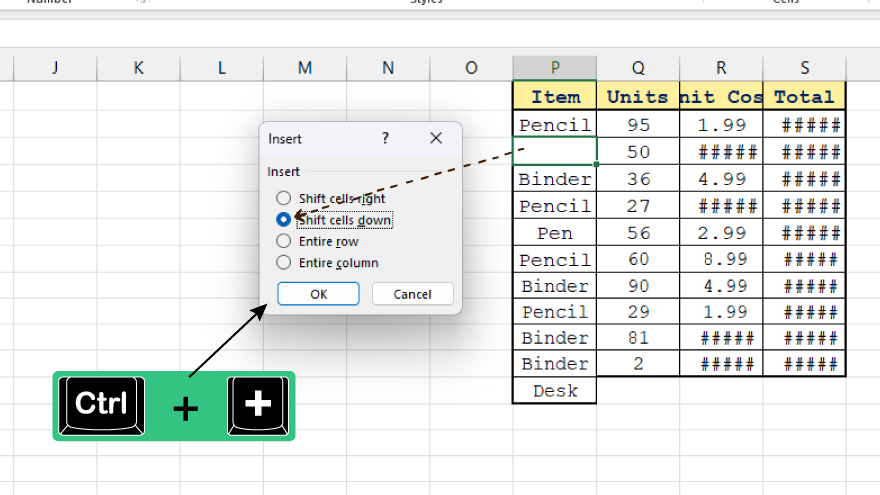
For efficiency, Excel supports keyboard shortcuts. To shift cells down using a shortcut, select your targeted cell or cells and press ‘Ctrl’ + ‘+’ (plus sign) on your keyboard. This opens the ‘Insert’ dialog box. Here, select ‘Shift cells down’ and press ‘Enter.’ Mastering these shortcuts is invaluable for frequent Excel users, especially when managing extensive datasets. Study these 10 Excel shortcuts for busy professionals to learn about shortcut keys.
Step 5. Shifting Multiple Rows or Columns
Excel also enables shifting multiple rows or columns simultaneously. After selecting the desired rows or columns, follow the previously mentioned steps. The selected rows or columns will shift down or to the right based on your choice. This feature is particularly handy for incorporating new data into large datasets. However, exercise caution with large selections, as overloading Excel with too many shifts at once can lead to decreased performance or crashes.
FAQs
How do I select multiple cells to shift down in Excel?
Hold down the ‘Shift’ key and use the arrow keys to select multiple cells.
Where is the ‘Insert’ menu located in Excel?
The ‘Insert’ menu is in the ‘Cells’ group under the ‘Home’ tab on the Excel ribbon.
What should I do after selecting the ‘Shift cells down’ option?
Click ‘OK’ to confirm and shift the selected cells downwards.
Can I use a keyboard shortcut to shift cells down in Excel?
Yes, press ‘Ctrl’ + ‘+’ (plus sign) to open the ‘Insert’ dialog box, then choose ‘Shift cells down.’
Is it possible to shift multiple rows or columns at once in Excel?
Select the rows or columns you want to shift, then follow the same steps for shifting cells down.
More in Excel

