Get Access to World’s largest Template Library & Tools

How to Add a Row in Microsoft Excel

Microsoft Excel spreadsheets that display data as rows, columns, and cells can be created quickly and easily by users. Additionally, Microsoft Excel lets you manage and organize your data by adding as many rows as you want.
How to Add a Row in Microsoft Excel

The addition of a Microsoft Excel row is just to insert a new blank row into the spreadsheet. You can add as many rows as you want.

  • Step 1: Open Microsoft Excel

    how to add a row in microsoft excel step 0

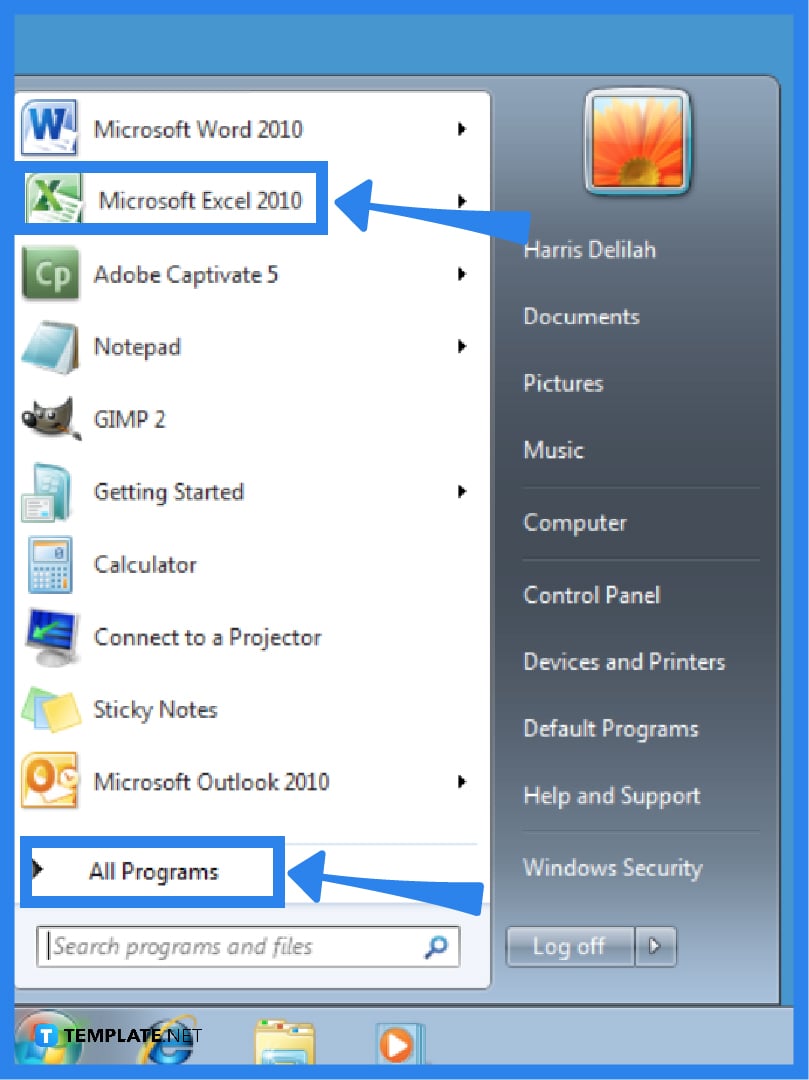
    Click on the Start or Orb button in the lower left corner of your desktop to bring up a list of all the installed apps on your computer and select All Programs. Select Microsoft Excel after that to open it. You may also just type in “Microsoft Excel” into the search bar on your desktop to find it fast and launch it.

  • Step 2: Begin With the New Worksheet or Select an Existing Excel File
    how to add a row in microsoft excel step 0

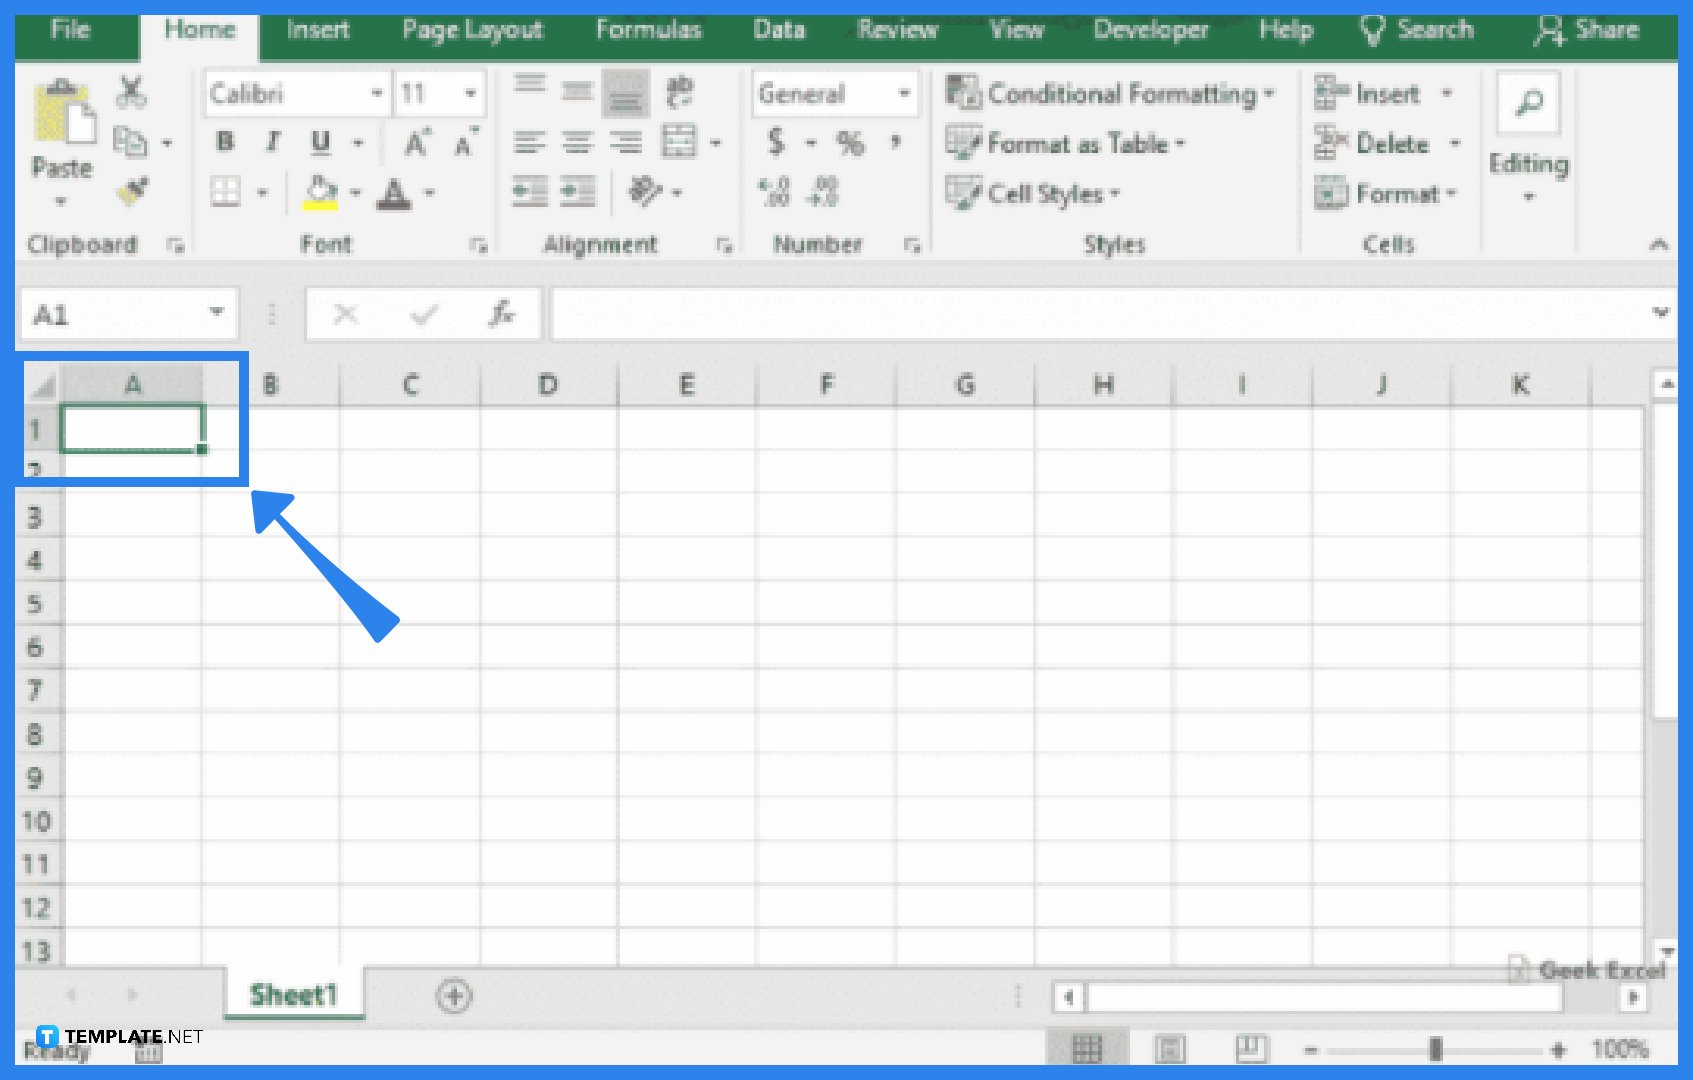
    Once Microsoft Excel is opened, you have the option of starting with a blank spreadsheet that is created automatically or opening an existing Excel file to add a row. If you’d like to edit an existing spreadsheet instead, go to the File tab of the Excel window and select Open. Click on the file to open it by navigating to its location on the menu that will appear.

  • Step 3: Adding Rows to the Spreadsheet
    how to add a row in microsoft excel step 0

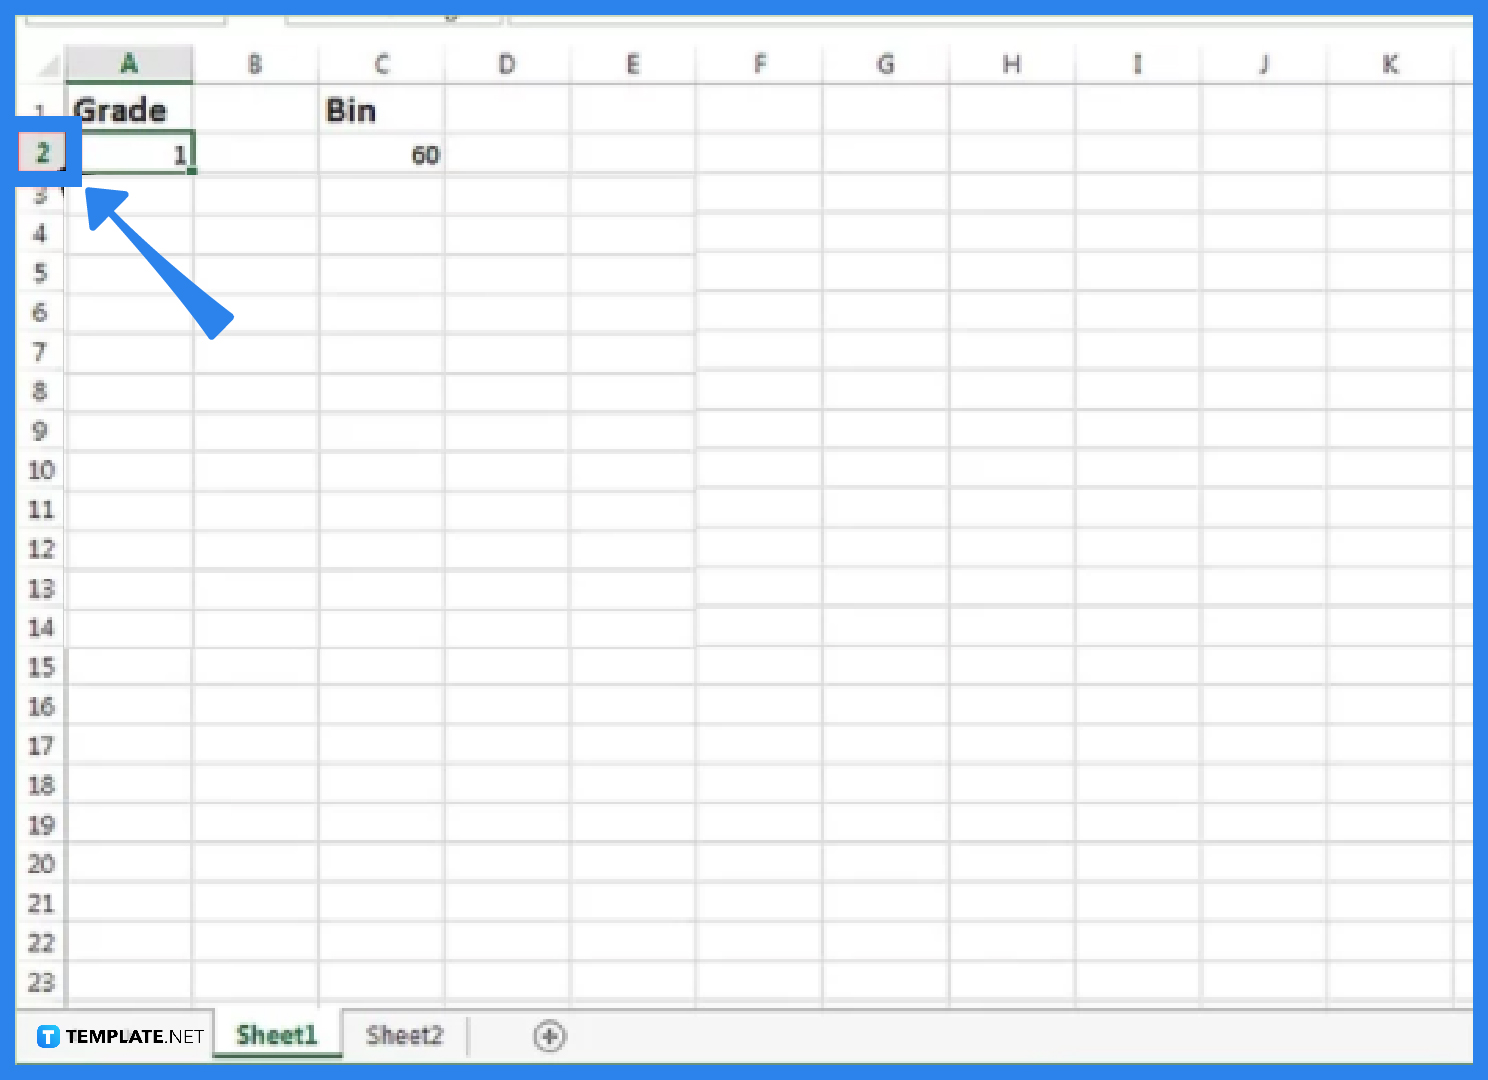
    The worksheet can now have a row added to it. Select any cell in the row number area of the spreadsheet. It is in the leftmost part of the spreadsheet and is represented by numbers. Next, right-click along the chosen row, and then, from the pop-up menu that displays, choose Insert. A new row is now inserted. Alternatively, you can choose any cell in the row number area and navigate to the Home tab in the Excel window. From there, you choose the Insert Sheet Rows under the Insert option to add a new row to the spreadsheet.

FAQs

How to add multiple rows in Microsoft Excel?

To add multiple rows, you first need to open the spreadsheet you want to work on. Select the number of rows in the spreadsheet that you wish to add. Right-click on the selected rows and select Insert from the pop-up menu. The number of rows you highlighted will be inserted above the rows you selected.

How to insert non-adjacent rows in Microsoft Excel?

In order to insert non-adjacent rows in Microsoft Excel, you must first find and open the spreadsheet to work on. Select the nonadjacent rows by holding down the CTRL key while doing a left-click on your mouse. After that, right-click on the selected rows and choose the Insert option from the pop-up menu that appears. The number of rows you highlighted will be inserted above the rows you selected.

What if the newly added row in Microsoft Excel has formatting?

Any new rows you add will inherit the formatting that has been applied to the selected row. After inserting the row, you can click the Insert Options button and choose one of the options provided if you don’t want the formatting to be applied to the new row. Format Same As Left, Format Same As Right, and Clear Formatting are the available options. If the Insert Options button is not visible, you go to the File tab, select Options, then Advanced, and in the Cut, Copy, and Paste group, you check the Show Insert Options buttons.

More in Microsoft Office

How Can I Run Microsoft Visio on MacHow to Create Custom Shapes in Microsoft Visio
Microsoft PublisherHow to Use Microsoft SharePoint in Business
How to Edit Body Header in Microsoft VisioHow to Add Legend in Microsoft Visio
How to Flatten an Image in Microsoft PublisherHow to Add a Subscript/Superscript to Microsoft Visio
How Can I Insert People in Microsoft Visio DiagramsHow To Create UML Diagrams in Microsoft Visio
How to Know the Version of Microsoft PublisherHow to Use Layers in Microsoft Visio
How To Create a Gantt Chart in Microsoft VisioHow to Add a Background in Microsoft Publisher
How to Use Microsoft SharePoint in BusinessHow Can Multiple People Edit a Document in Microsoft Visio
How to Add Arrow in Microsoft VisioHow to Make a Copy Group Form in Microsoft Forms for Reusing
How to Open a Microsoft Publisher Document Without PublisherHow to Download Multiple Files from Microsoft SharePoint Online
How to Create a Website Page Using Microsoft PublisherHow to Turn On Content Approval in SharePoint
How to Convert SharePoint Online Site to Microsoft TeamsHow to Stop Microsoft Teams from Automatically Opening
How to Print a Booklet in Microsoft PublisherHow to Create Flows in Microsoft Teams
How to Run Microsoft Publisher on ChromebookHow to Build a Microsoft SharePoint Site Multi-Lingual Site
How to Add a Chat to Microsoft SharePointHow to Edit Microsoft Publisher Files on Mac
How to Import/Export Excel Into Microsoft SharePointHow to Save Microsoft Forms as a Template
How to Change the Time Zone in Microsoft TeamsHow to Use Multiple Sharing Options in Microsoft Forms
How to Change Status on Microsoft SharePointHow To Make/Create a Mirror Image in Microsoft Publisher [Templates + Examples] 2023
How to Create Sequence Diagram Using Microsoft VisioHow to Make a Supertype and Subtype in Microsoft Visio
How to Create Link to Download File in Microsoft SharePointHow to Download Folder From Microsoft Sharepoint
How to Share a Microsoft SharePoint Site ExternallyHow To Make/Create a Booklet in Microsoft Publisher [Templates + Examples] 2023
How to Flip Shape in Microsoft VisioHow to Make a Calendar in Microsoft Publisher
How to Trim Shapes and Lines in Microsoft VisioHow to Print a Brochure on Microsoft Publisher
How Do I Upgrade to 64-bit Microsoft VisioHow to Make a Brochure in Microsoft Publisher
How to Create a Poster in Microsoft PublisherHow to Build Organization Chart Microsoft Visio
How to Increase Print Resolution of Image in Microsoft PublisherHow to Record Microsoft Teams Meeting
How to Change Border Title in Microsoft VisioHow to Make Microsoft Teams Stay Green
How to Mute/Unmute a Chat in Microsoft TeamsHow to Create a Banner in Microsoft Publisher
How to Convert Microsoft Visio to PDFHow to Add Microsoft Visio to Office 365
How to Register for a Microsoft Office Account to Use for Microsoft TeamsHow to See Multiple People at the Same Time in a Meeting on Microsoft Teams
How to Join a Microsoft Teams MeetingHow to Access Microsoft Visio
How to Create a Logo in Microsoft PublisherHow to Create Class Diagram in Microsoft Visio
How to Delete/Remove a Page in Microsoft SharePointHow to Change Logo on Microsoft SharePoint
How to Use Microsoft SharepointHow to Print Microsoft Visio Document
How to Embed a Modern Calendar to Microsoft SharePointHow To Create a Book in Microsoft Publisher
How to Convert Microsoft Visio Object to JPEGHow to Copy and Paste Objects in Microsoft Publisher
How to Delete A File in Microsoft SharePointHow to Fully Close Microsoft Teams
How to Send a Form on a Group Chat in Microsoft TeamsHow to Create a Flowchart in Microsoft Visio
How to Blur Background on Microsoft TeamsHow to Change Background on Microsoft Teams
Microsoft TeamsHow to Create a Simple Microsoft SharePoint Blog
How to Convert Microsoft Publisher File to PDFHow to Open a Microsoft Publisher File
How to Print in Microsoft PublisherHow to Create a Folder in Microsoft Sharepoint
How to Switch Microsoft Word from Dark ModeHow to Set Margins in Microsoft Word
How to Insert Horizontal Lines in Microsoft WordHow to Landscape on Microsoft Word
How To Make/Create a Document in Microsoft Publisher [Templates + Examples] 2023How to Create A Team in Microsoft Teams
How to Block Someone on Microsoft TeamsHow to View the Microsoft Teams Meeting Link in Outlook
How do I Merge Microsoft Publisher FilesHow to Change Name/Status on Microsoft Teams
How to Add Multiple Users in a Chat Group in Microsoft TeamsHow to Make/Create a Border in Microsoft Publisher [Templates + Examples] 2023
How to Add Someone External to Microsoft TeamsHow to Sign in/Sign Out of Microsoft Teams
How to Create a Newsletter in Microsoft PublisherHow to Download Microsoft Publisher for Free [Templates + Examples] 2023
bottom banner